![]()
![]()
 |
It's easy to create an animation with Proof Animation. |
| Step 1 |
| Use Proof Animation's versatile tools to build a layout file | |
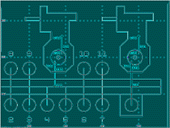
| Draw or import the
backdrop over which objects move Proof gives you easy-to-use drawing tools for creating a schematic representation of your system. If you already have a CAD drawing of your system, Proof can import it as a DXF file and quickly eliminate non-essential details. Layout components are represented geometrically, so you can create your layout exactly to scale, with as much detail and accuracy as you need. |
|
| Define
object classes Moving objects have shapes, colors, and other properties determined by their object classes. An object class is a "cookie cutter" for creating individual objects. In a transportation animation, classes would be defined for cars, trucks, buses, pedestrians, etc. |
 |
| Define
paths along which objects will move In most systems, objects follow fixed routes, such as roads, aisles, or shipping lanes. Proof allows you to specify the lines and arcs comprising a path, using a point-and-click interface. |
 |
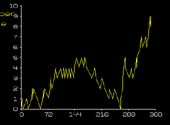
| Add
annotations, plots, bar graphs, and status
messages An animation provides many insights as you watch objects move through a system. These insights can be greatly enhanced by adding dynamic messages, "dancing" bar graphs, and plots to portray operation of the system. |
 |
| Step 2 |
| Instrument your model to create a trace file | |||
| A trace file is a
time-ordered sequence of commands that controls
the dynamic behavior of an animation. Each
command specifies an event which alters the state
of the animation. For example, a create
command is used to create an instance of an
object (using an object class as a prototype). A place
command places the new object on a path, and a set
speed command specifies the object's
speed. The collection of trace file commands is
small and easily mastered, but very powerful. The first step in creating a trace file is to decide which events in your simulation model need to be represented on the screen as events in the animation. Typically, only a small subset of the model's events affect the animation. Next, at each point in the simulation model where a model event needs to be represented as an animation event, an output statement must be inserted to write a command to the trace file. Trace files are simple ASCII files, and commands are free-format, so virtually any language which can write an ASCII file can produce a trace file.
|
|||
Finally, once you begin running an animation, you may want to augment your model to include additional realism. Sometimes, simplifications that are OK in a model, such as performing an event in zero time, are anunacceptably unrealistic in an animation. |
|||
| Step 3 |
| Take a good look at your animation | |
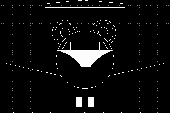
| Watch
your system in operation Proof Animation can move hundreds of objects smoothly and realistically across the screen. Conditions which would be very hard to detect without animation can practically leap off the screen. For example, if your model erroneously allows two vehicles to move through one another, you'll know in seconds as you watch the animation. If a picture is worth a thousand words, an animation is worth a million. |
|
| Put
your system under the magnifying glass Proof's postprocessing architecture makes it easy to focus on specific areas of your animation. You can jump back in time, zoom in on a problem area, or replay the animation at a slower speed. |
|
| View
animations that are larger than one screen Proof's animation canvas is roughly 50 screens high and 50 screens wide, and Proof supports screen resolutions of up to 1280 x 1024. Using Proof, you can build large, complex layouts without running out of space or sacrificing detail. |
|
| Use
split screens to focus many areas at one time Split screens are great for showing your entire system in one window and the simulation clock, statistics or enlarged views of specific areas in their own windows. Proof automatically updates moving objects in all windows. |
|
| Step 4 |
| Finish your animation with a professional presentation | |
| As you
refine your system design, you produce animations
that take a long time to view. To present results
to your boss, sponsors, or prospective clients,
you can reduce viewing time by extracting the
highlights of your animations and tying them
together into a formal presentation. Proof's unique presentation mode has tools that let you link together your own slides with snippets of animation in a seamless presentation. Special effects such as fades and dissolves result in a polished appearance. A Proof presentation can be viewed without ever leaving Proof. Awkward transitions between computer displays and overhead transparencies are eliminated. You can put the whole show on your laptop and take it on the road. |
|
| Build
self-guided presentations You can build custom menus into your presentations so viewers can pick the parts of your presentation they want to see. |
|
| Prepare
royalty-free demo disks The Proof Demo Maker lets you package and distribute your animations to others - royalty-free. There is no extra charge for the Demo Maker; it's built into all versions of Proof, including Student Proof. Animations packaged using the Demo Maker can be viewed using the free, redistributable Proof Demo Viewer or any licensed version of Proof. The Demo Viewer prohibits modification of an animation. Once an animation has been packaged using the Demo Maker, it cannot be modified. |
|